Difference between revisions of "Method of using commands to test recording"
(Created page with "1) There is an onboard MIC on the development board, the location is as follows:<br><br> Image:Pi-5-details2-pic16.png<br><br> 2) Running the '''test_record.sh main''' c...") |
(No difference)
|
Revision as of 15:57, 24 April 2023
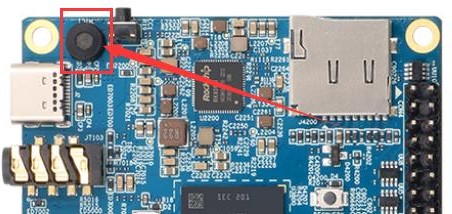
1) There is an onboard MIC on the development board, the location is as follows:

2) Running the test_record.sh main command will record a piece of audio through the onboard MIC, and then play it to HDMI and headphones
| orangepi@orangepi:~$ test_record.sh main Start recording: /tmp/test.wav |
3) In addition to the onboard MIC, we can also record audio through headphones with MIC function. After inserting the headset with MIC function into the development board, run the test_record.sh headset command to record a piece of audio through the headset, and then play it to HDMI and the headset.
| orangepi@orangepi:~$ test_record.sh headset Start recording: /tmp/test.wav |